
Hands can tell you more about a person than their clothes or accessories, because they primarily reflect their attitude towards themselves. That is why manicure has become one of the most popular procedures among both women and men. Modern techniques allow you to choose the best care option for any type of nails and skin. A special place among them is occupied by a combined manicure, a method that combines the advantages of classical and hardware techniques. In this article, we'll figure out what a combined manicure is, what it looks like, and what stages it includes. We'll also talk about how to perform this procedure at home and what you need.
What is a combi manicure?
Everyone's nails and hand skin are different, and a combination manicure allows you to take these features into account, adapting the technique to the needs of the client. This method combines elements of several types of manicure at once:
- classic — the cuticle is removed with nippers or scissors;
- hardware — the keratinized skin is treated with a special nail drill bit;
- European — the cuticle is softened with a remover and pushed back with an orange stick.
A combi manicure has many advantages. The main ones are precision, aesthetic appearance, and long-lasting effect. It is ideal for any type of hand skin, including sensitive and dry.
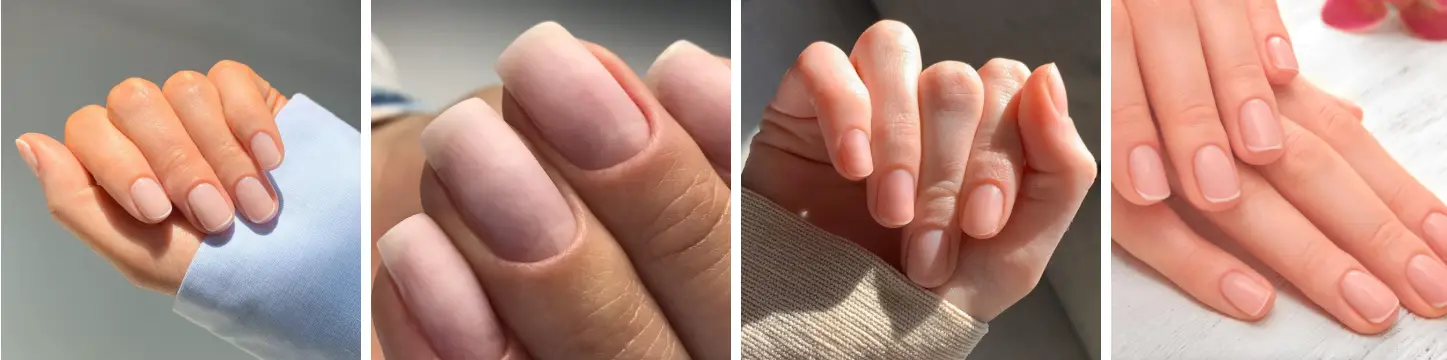
What a combo manicure looks like
Combination manicure is a technique after which you will get well-groomed hands with a clear and symmetrical nail shape, perfectly processed cuticle, and smooth side rollers. After the procedure, the nail plate can be covered with gel polish or left natural. It all depends on your desires and preferences.
How a combined manicure is performed
A combined manicure consists of several stages that may vary depending on the condition of the client's hands. Let's have a look at what steps the nail technician performs during the process.
Step 1: Preparing hands and nails
A combined manicure begins with the client's hands being treated with an antiseptic for disinfection. If there is an old coating (gel polish, varnish), it is removed with a nail drill or remover. After that, the nails are shaped with a nail file. Next, the nail technician assesses the condition of the cuticle, nail plate, and skin to choose the best tools for the next steps.
Step 2: Cuticle treatment
When performing a combi manicure, the cuticle is softened with a remover (acid-based product) for 30–60 seconds, then pushed back with a pusher or orange stick. Rough skin is removed with nippers or scissors (trimming method). Next, the remaining pterygium is removed with a router.
Step 3: Grinding
The nail plate is polished with a buffer of different abrasiveness to polish the plate or prepare it for coating. The side rollers are processed with a cylinder drill bit to remove dead skin.
Step 4: Application of the coating
At this stage, the nail is coated with a varnish, gel polish, or strengthening coating. The choice depends on the condition of the plate and the client's wishes.
Stage 4: Additional care (optional)
The combined manicure is completed with SPA procedures to enhance the effect. It can be a hand scrub, mask, or paraffin therapy. They are very relevant in the cold season, when additional moisturizing is needed, as well as for clients with dry hand skin.
Combination manicure at home
It is quite possible to do a combination manicure at home if you have the right set of tools and basic skills. To do this, you need to follow these steps:
- Start your combo manicure by treating your hands with an antiseptic. If your nails have an old coating (gel polish or regular varnish), remove it with a special liquid or a nail drill bit.
- Use a nail file to shape your nails to the desired shape — square, oval, or almond-shaped. At this stage, it is important to take your time so that the contour is even and symmetrical.
- Apply the remover to the cuticle and wait 30–60 seconds (the exact time depends on the specific product). Then gently push back the cuticle with a pusher or an orange stick. Remove excess skin with nippers or scissors, holding the tool at a 45-degree angle.
- Take the nail drill bit and remove the remaining pterygium with light movements, without strong pressure. After that, treat the area of the side rollers. Work slowly to avoid injuring the skin and the nail plate.
- If you are planning to cover your nails with gel polish, go over the plate with a buffer. Then apply the base and dry it in the lamp (UV — 2 minutes, LED — 30–60 seconds). Next, apply several coats of coloured polish and a top to fix it. Dry each layer separately.
- A combined manicure does not necessarily end with the application of a coating. If you prefer natural nails, polish the plate with a buffer (800-1000 grit) to make it smooth.
- After performing a combined manicure, apply cuticle oil (with vitamin E or jojoba oils) to the area around the nail, rubbing it into the skin with light massage movements. Then use a hand moisturizer.
A combination manicure is a complex procedure, and the first attempts may not be perfect. This is quite normal. The more attempts and practice you have, the more professional the final result will look.
What you need for a combined manicure
To perform a combined manicure, you need to purchase a set of certain tools and materials, namely:
- Antiseptic — for disinfecting hands and tools.
- File (180/240 grit) — for shaping nails.
- Buff — for sanding the plate.
- Stainless steel nippers or scissors — for cutting the cuticle.
- Nail drill a bit with attachments — for hardware processing of the cuticle and side rollers.
- Remover — a tool for softening the cuticle.
- Pusher or orange stick — to push back the cuticle.
- Oil and cream — to moisturize the skin.
To make a perfect combo manicure, you should give preference to good quality tools.
A combi manicure is an effective procedure that combines the best of different techniques. With its help, your hands will look well-groomed, and the result will delight you for more than one week.